PEBL HTML-Lite Markup Guide
Quick Summary: Learn how to use PEBL's HTML-like markup system to create rich, formatted text in Labels and TextBoxes with bold, italic, colors, headers, justification, and more.
What You'll Learn
- How to enable formatted text mode in PEBL
- Using inline formatting tags (bold, italic, underline, colors, sizes)
- Creating headers and applying text justification
- Working with block-level elements (lists, indents, horizontal rules)
- Combining tags to create complex formatted layouts
- Best practices for Labels vs TextBoxes
Overview
PEBL provides a simple HTML-like markup system for formatting text in Labels and TextBoxes. This markup system allows you to create rich, formatted text without requiring external libraries or complex HTML rendering.
To enable formatted text mode, set the .FORMATTED property to 1:
tb <- MakeTextBox("Your <b>formatted</b> text here", font, 400, 300)
SetProperty(tb, "FORMATTED", 1)
Inline Formatting Tags
Inline tags can be used within a line of text to change formatting properties.
Bold, Italic, and Underline
Example code:
text <- "<h2>Basic Inline Formatting</h2>" + CR(1) + CR(1) +
        "Normal text, <b>bold text</b>, <i>italic text</i>, <u>underlined text</u>" + CR(1) + CR(1) +
        "You can <b><i>combine</i></b> formatting: <b><u>bold underline</u></b>, <i><u>italic underline</u></i>" + CR(1) + CR(1) +
        "Even <b><i><u>all three together</u></i></b>!"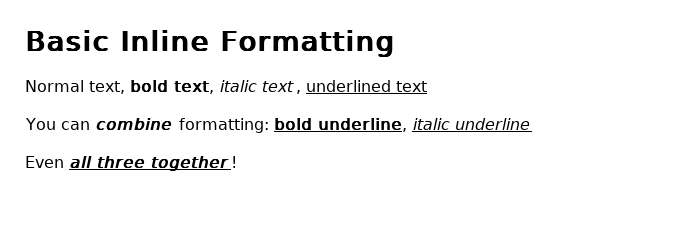
<b>bold text</b>- Makes text bold<i>italic text</i>- Makes text italic<u>underlined</u>- Underlines text
Tags can be combined:
<b><i>bold and italic</i></b>
<b><u>bold and underlined</u></b>
<i><u>italic and underlined</u></i>
<b><i><u>all three together</u></i></b>
Colors
Example code:
text <- "<h2>Colors and Font Sizes</h2>" + CR(1) + CR(1) +
        "<c=red>Red text</c>, <c=blue>blue text</c>, <c=green>green text</c>" + CR(1) + CR(1) +
        "<c=#FF6600>Hex colors work too: #FF6600 (orange)</c>" + CR(1) + CR(1) +
        "Different <size=12>sizes</size> <size=16>are</size> <size=20>available</size> <size=24>too</size>!"
Use the <c> tag to change text color:
<c=red>red text</c>- Named colors (supports all 752 X11 color names)<c=#FF0000>hex color</c>- Hex colors in#RRGGBBformat<c=#F00>short hex</c>- Short hex colors in#RGBformat (automatically expanded)
Supported color names include:
- Basic:
red,blue,green,yellow,orange,purple,black,white,gray - Extended:
darkred,lightblue,forestgreen,navy,cyan,magenta,brown - ...and 745 more X11 color names
Examples:
<c=red>This is red</c>
<c=blue>This is blue</c>
<c=#FF6600>This is orange (#FF6600)</c>
<c=darkgreen>This is dark green</c>
Font Sizes
Change font size with the <size> tag:
<size=12>small text</size>- 12pt text<size=24>large text</size>- 24pt text
Sizes can range from 8pt to 200pt.
Example:
Normal text <size=12>smaller</size> <size=20>bigger</size> <size=24>even bigger!</size>Line Breaks
Insert a line break with <br>:
First line<br>
Second line<br>
Third line
Block-Level Tags
Block-level tags affect entire lines or paragraphs. These are primarily used in TextBoxes.
Headers
Example code:
text <- "<h1>Header Level 1 (32pt, bold)</h1>" + CR(1) + CR(1) +
        "<h2>Header Level 2 (28pt, bold)</h2>" + CR(1) + CR(1) +
        "<h3>Header Level 3 (24pt, bold)</h3>" + CR(1) +
        "<h4>Header Level 4 (20pt, bold)</h4>" + CR(1) +
        "<h5>Header Level 5 (18pt, bold)</h5>" + CR(1) +
        "<h6>Header Level 6 (16pt, bold)</h6>"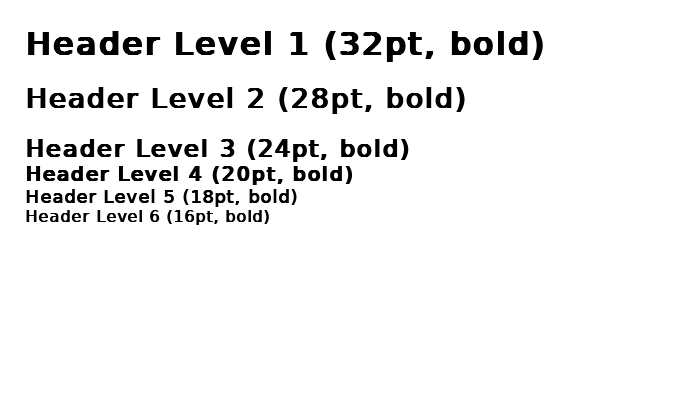
Headers (<h1> through <h6>) create bold text at predefined sizes:
<h1>Heading 1</h1>- 32pt bold<h2>Heading 2</h2>- 28pt bold<h3>Heading 3</h3>- 24pt bold<h4>Heading 4</h4>- 20pt bold<h5>Heading 5</h5>- 18pt bold<h6>Heading 6</h6>- 16pt bold
Headers with justification (see Text Justification section):
<h1=center>Centered Header 1</h1>
<h2=left>Left Header 2</h2>
<h3=right>Right Header 3</h3>
Text Justification
Example code:
text <- "<h2=center>Text Justification</h2>" + CR(1) + CR(1) +
        "<p=left>This line is left-aligned (default)" + CR(1) + CR(1) +
        "<p=center>This line is center-aligned" + CR(1) + CR(1) +
        "<p=right>This line is right-aligned" + CR(1) + CR(1) +
        "<h3=left>Left Header</h3>" + CR(1) +
        "<h3=center>Center Header</h3>" + CR(1) +
        "<h3=right>Right Header</h3>"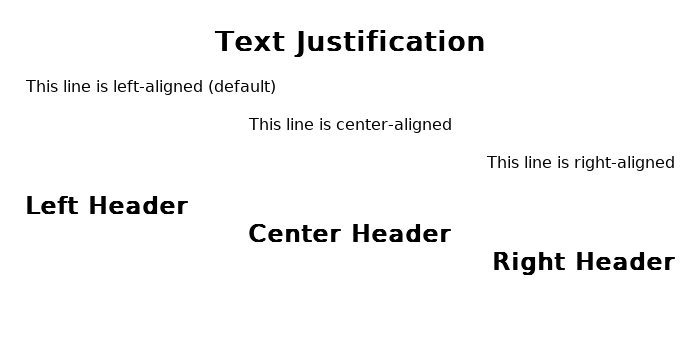
Control text alignment with the <p> tag:
<p=left>Left-aligned text- Align text to the left (default)<p=center>Center-aligned text- Center text horizontally<p=right>Right-aligned text- Align text to the right
Justification persists until the next newline, then resets to default (left).
Example:
<p=left>This paragraph is left-aligned.
<p=center>This paragraph is centered.
<p=right>This paragraph is right-aligned.
Combining justification with formatting:
<p=center><b>Bold Centered Text</b>
<p=right><i>Italic Right-Aligned Text</i>
<p=center><c=red><u>Red Underlined Centered Text</u></c>
Horizontal Rules
Example code:
text <- "<h2>Horizontal Rules</h2>" + CR(1) +
        "Text above the line" + CR(1) +
        "<hr>" + CR(1) +
        "Text below the line" + CR(1) + CR(1) +
        "Another section" + CR(1) +
        "<hr>" + CR(1) +
        "And another section"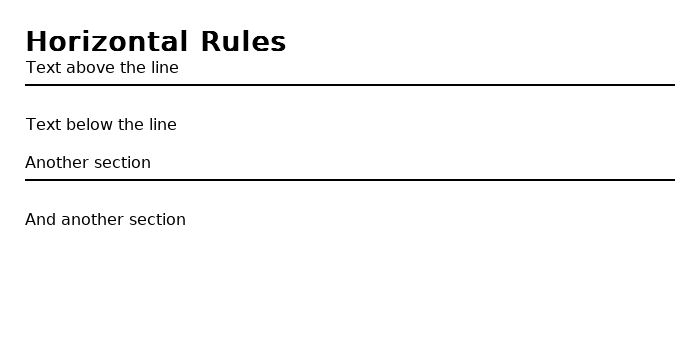
Insert a horizontal line with <hr>:
Section 1
<hr>
Section 2
<hr>
Section 3
Bullet Lists
Example code:
text <- "<h2>Lists and Indentation</h2>" + CR(1) + CR(1) +
        "<li>First bullet item" +
        "<li>Second bullet item" +
        "<li><b>Bold</b> bullet with <c=blue>colored text</c>" + CR(1) +
        "<indent>Indented by 4 character widths<br>" +
        "<indent=8>Indented by 8 character widths<br>" +
        "<indent=12>Indented by 12 character widths"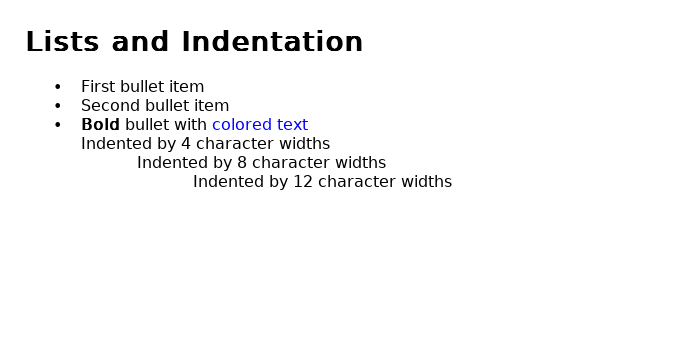
Create bulleted lists with the <li> tag:
<li>First item
<li>Second item
<li>Third item
Each <li> tag automatically:
- Starts on a new line
- Adds a bullet point (•)
- Indents the text
Bullets can contain formatting:
<li><b>Bold</b> bullet point
<li><i>Italic</i> bullet point
<li><c=blue>Blue</c> bullet point
Indentation
Control horizontal positioning with the <indent> tag:
<indent>- Indent by 4 character widths (default)<indent=8>- Indent by 8 character widths<indent=N>- Indent by N character widths
Indent acts like a tab stop, positioning text at an absolute horizontal position.
Example - Creating columns:
Name<indent=15>Age<indent=25>City
Alice<indent=15>25<indent=25>Boston
Bob<indent=15>30<indent=25>Chicago
Combining Tags
Tags can be freely combined to create rich formatting:
<h2=center><c=blue>Blue Centered Header</c></h2>

<p=center><b><u>Important Notice</u></b></p>

<li><b>Step 1:</b> <c=red>Read carefully</c>
<li><b>Step 2:</b> <c=green>Proceed when ready</c>
Practical Example
Example code:
text <- "<h1=center>Psychology Experiment</h1>" + CR(1) + CR(1) +
        "<h3>Instructions:</h3>" + CR(1) +
        "<li>Press the <b>spacebar</b> when you see a <c=red>red</c> stimulus" +
        "<li>Press the <b>enter key</b> when you see a <c=blue>blue</c> stimulus" +
        "<li>Respond as <u>quickly</u> and <u>accurately</u> as possible" + CR(1) +
        "<hr>" + CR(1) +
        "<p=center><b>Press any key to begin</b>"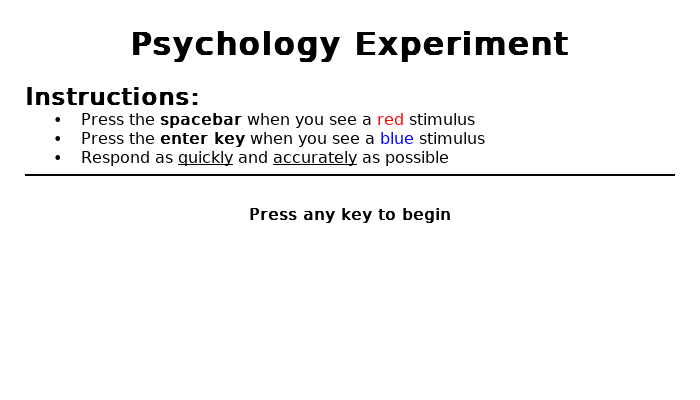
Here's the complete function showing an instruction screen for a psychology experiment:
define ShowInstructions()
{
    gWin <- MakeWindow("white")
    font <- MakeFont("DejaVuSans.ttf", 0, 14, MakeColor("black"), MakeColor("white"), 0)

    text <- "<h1=center>Psychology Experiment</h1>" + CR(1) + CR(1) +
            "<h3>Instructions:</h3>" + CR(1) +
            "<li>Press the <b>spacebar</b> when you see a <c=red>red</c> stimulus" +
            "<li>Press the <b>enter key</b> when you see a <c=blue>blue</c> stimulus" +
            "<li>Respond as <u>quickly</u> and <u>accurately</u> as possible" + CR(1) +
            "<hr>" + CR(1) +
            "<p=center><b>Press any key to begin</b>"

    tb <- MakeTextBox(text, font, 650, 350)
    SetProperty(tb, "FORMATTED", 1)
    AddObject(tb, gWin)
    Move(tb, 400, 300)
    Draw()

    WaitForAnyKeyPress()
}
Quick Reference Table
| Tag | Description | Example |
|---|---|---|
<b>...</b> | Bold text | <b>bold</b> |
<i>...</i> | Italic text | <i>italic</i> |
<u>...</u> | Underlined text | <u>underline</u> |
<c=color>...</c> | Colored text | <c=red>red text</c> |
<size=N>...</size> | Sized text | <size=20>big</size> |
<h1>...</h1> through <h6>...</h6> | Headers (bold, sized) | <h1>Title</h1> |
<h1=just>...</h1> | Header with justification | <h1=center>Title</h1> |
<p=just> | Paragraph justification | <p=center>centered |
<br> | Line break | Line 1<br>Line 2 |
<hr> | Horizontal rule | <hr> |
<li> | Bullet list item | <li>Item 1 |
<indent> or <indent=N> | Indentation | <indent=8>indented |
Justification values: left, center, right
Technical Notes
Scope and Persistence
- Inline formatting (
<b>,<i>,<u>,<c>,<size>): Requires closing tags, applies only to enclosed text - Justification (
<p=...>): Applies to current line, resets after newline - Indentation (
<indent>): Applies to current line, resets after newline
Tag Nesting
Tags can be nested, but note that PEBL's parser is simple and non-validating:
Good nesting:
<b><i>bold italic</i></b>
<c=red><b>red bold</b></c>
Avoid improper nesting:
<b><i>text</b></i> <!-- Not recommended -->Performance
Formatted text uses more memory and rendering time than plain text. For very long documents (>10,000 characters), consider:
- Breaking text into multiple TextBoxes
- Using plain text where formatting isn't needed
- Pre-computing layouts when possible
Labels vs TextBoxes
- Labels: Support all inline formatting tags (
<b>,<i>,<u>,<c>,<size>,<h1>-<h6>,<br>) - TextBoxes: Support all tags including block-level formatting (
<hr>,<li>,<indent>,<p>)
For single-line or simple formatted text, use Labels. For complex multi-line formatted text with justification, bullets, or indentation, use TextBoxes.
Example Templates
Survey Question
text <- "<h3>Question 1:</h3>" + CR(1) +
        "How satisfied are you with the experiment?" + CR(1) + CR(1) +
        "<li>Very Satisfied" +
        "<li>Satisfied" +
        "<li>Neutral" +
        "<li>Dissatisfied" +
        "<li>Very Dissatisfied"
Results Screen
text <- "<h1=center>Experiment Complete!</h1>" + CR(1) + CR(1) +
        "<hr>" + CR(1) +
        "<h3>Your Results:</h3>" + CR(1) +
        "<indent>Accuracy:<indent=20>" + ToString(accuracy) + "%" + CR(1) +
        "<indent>Reaction Time:<indent=20>" + ToString(rt) + " ms" + CR(1) +
        "<hr>" + CR(1) +
        "<p=center><c=green><b>Thank you for participating!</b></c>"
Warning Message
text <- "<p=center><c=red><h2>⚠ WARNING ⚠</h2></c>" + CR(1) + CR(1) +
        "<p=center>This experiment contains <b>flashing lights</b>." + CR(1) +
        "<p=center>Not suitable for individuals with photosensitive epilepsy." + CR(1) + CR(1) +
        "<hr>" + CR(1) +
        "<p=center>Press <b>Q</b> to quit or <b>C</b> to continue"
Additional Resources
- PEBL Manual: Section on TextBox and Label objects
- Test File: See
test-htmllite-markup.pblin the PEBL installation for a comprehensive test of all features
Last Updated: January 2026 PEBL Version: 2.3+ Feature: HTML-Lite Markup System